Showing posts with label CHOOSE. Show all posts

Lookup with multiple criteria's

This article was originally written for the Microsoft Excel Blog. The purpose of this article is to show Excel users some technique’s, and Excel functions, that they can use to lookup up a value on a table, using more than one criteria. If you have only one criteria, it’s simple, you can use a plain VLOOKUP formula to do that. If you want to use more than one, then there are lots of ways of doing it, using several of Excel’s functions like VLOOKUP, LOOKUP, MATCH, INDEX, etc.

Let’s see a scenario where we want to use two criteria’s to return a value from a table. This is the data table that we have:

image

As you can see, we want to use a “Name” and “Product” criteria to return a “Qty” value on cell C18. We are going to look for the Name “James Atkinson” and the Product “Milk Pack” to return the Qty from the table. Because the value that we want to return is a number, we can use a simple SUMPRODUCT() formula in C18 cell, like this:

=SUMPRODUCT((B3:B13=C16)*(C3:C13=C17)*(D3:D13))

What this does is look on the range B3:B13 for the value on cell C16 and on the range C3:C13 for the value on cell C17 and where it finds both, return the value on column D, from the same row where it found both criteria’s. Here’s how it will look:

image

It is returning the value 1 that corresponds to the value on cell D4 because it found “James Atkinson” Name on row 4 and also “Milk Pack” on the same row, thus returning the value of column D from that row. Let’s just change value on cell C5 from “Wine Bottle” to “Milk Pack” to see what happens with the formula on cell C18:

image

Because our formula found two lines where both criteria’s were found, it is summing the values on column D on rows where they were found, giving us a Qty of 6.

This technique cannot be used is we wanted to look for two criteria’s and return a text result. For instance, this, would not work:

image

We are looking for the Name “James Atkinson”, where the Qty is 1 and we want to return the Product name that matches this two criteria’s. This formula would give us a #VALUE error! Instead we could use a formula using a combination of SUMPRODUCT, INDEX and ROW functions, like this:

=INDEX(C3:C13,SUMPRODUCT((B3:B13=C16)*(D3:D13=C18)*ROW(C3:C13)),0)

We use the SUMPRODUCT function to find out the row where both criteria’s are found and return the corresponding row number using the ROW function. Then we use it on the INDEX function to return the value on the array C3:C13 that is on the row number provided. The result will be like this:

image

This could also be done using a different technique. You could use this formula on cell C17:

=LOOKUP(2,1/(B3:B13=C16)/(D3:D13=C18),(C3:C13))

The result will be the same as the previous solution. What this formula does, is divide 1 by an array of True/False values (B3:B13=C16) and then by another array of True/False (D3:D13=C18). This will return 1 or a #DIV/0 error. Using 2 as the lookup value, then the match will be with the last numeric value in the range, i.e. the last row where both conditions are True. This will be our "vector form" of the LOOKUP, so then you get the corresponding value returned from C3:C13. I used 2 as the LOOKUP value but it can be any number, starting at 1. If the formulas don’t find any match, of course you will get a #N/A error!

You could also use an array formula, using the MATCH function, like this:

{=INDEX(C3:C13,MATCH(1,(B3:B13=C16)*(D3:D13=C18),0))}

On this technique, I used the MATCH function to find the row where both conditions are found. This will return a value of 1 that will be matched to the 1 that was used as the lookup value of the MATCH function, thus returning us the row where the conditions are met. Using the INDEX value, we look for the value that is on the range C3:C13, that is on the row that was returned from the MATCH function, in this case, it was row 2, that corresponds to the second row on C3:C13.

All of this examples show you how to use two criteria’s for your lookups. It’s easy to do it if you have more than two, just add then to your formulas. Here how the formulas presented before, would look if you add one more criteria:

=SUMPRODUCT((B3:B13=C16)*(C3:C13=C17)*(E3:E13=C18)*(D3:D13))

=INDEX(C3:C13,SUMPRODUCT((B3:B13=C16)*(D3:D13=C18)*(E3:E13=C18)*ROW(C3:C13)),0)

=LOOKUP(2,1/(B3:B13=C16)/(D3:D13=C18)/(E3:E13=C18),(C3:C13))

{=INDEX(C3:C13,MATCH(1,(B3:B13=C16)*(D3:D13=C18)*(E3:E13=C18),0))}

As you can see, depending on your data tables, you can use several different techniques to lookup your values, using different Excel functions. Hope that you can apply this to your own Excel sheets.

Display Weekdays names

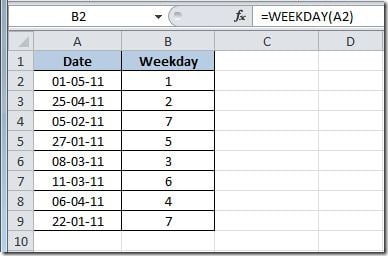
This is a common task. We have a list of dates and we want to get the corresponding weekdays. We can use the WEEKDAY() function to get it and the result will be like this:

WEEKDAY1

On column A we have our dates and on column B, using the WEEKDAY() function we get the number corresponding to the weekday. But this is not a good way of displaying the weekday, we would like it to display it as the name of the weekday, not a number, right? There are numerous ways that we can change that. I’m going to show you two of them.

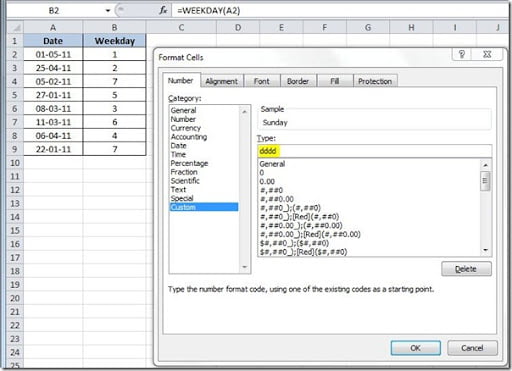
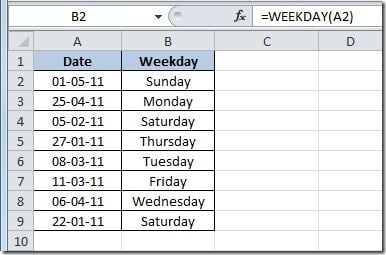
The first, and simplest way, is to format column B with a custom format. For that, just select the values on column B and right-click to select Format Cells and on the Number tab, choose the Custom Category and insert Type as dddd. This will give the names of the weekdays like “Sunday”. If you insert a type ddd it will show you the names like “Sun”.

WEEKDAY2

This is how it will look like after the formatting:

WEEKDAY3

Another way you could do this is using the CHOOSE() function with a formula like this on cell B2 and then copy down:

=CHOOSE(WEEKDAY(A2),"Sunday","Monday","Tuesday","Wednesday","Thursday","Friday","Saturday")

The result will be the same. This last method is just to show you that there are lots of ways of doing the same thing in Excel.

ERROR.TYPE() Function

This function returns a value corresponding to the type of Excel error. This is the syntax:

ERROR.TYPE(error_val)

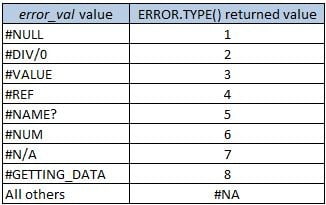
error_val is a reference to a cell that has a formula that you want to check if it returns an error value. Here are the possible return values:

ERROR_TYPE1

This function can be very useful to check if a certain formula returns an error, so that you can display a custom error message to the user. For that you can use the IF() function combined with the CHOOSE() function, like this:

=IF(ERROR.TYPE(A2)<=8,CHOOSE(ERROR.TYPE(A2),"Ranges not intersecting","0 Divisor","Wrong data type","Invalid cell reference", "Unrecognized range or function name","Number error","Inappropriate function argument","Waiting for query data"),"")

This formula will check if there is an error on cell A2 formula and if it returns a ERROR.TYPE value will choose the appropriate error message to display on the cell where this formula is placed. If there is no error, it will return nothing. Here are some examples of the use of it:

ERROR_TYPE2

You can improve this formula to give you the cell address where you have the error by using the CELL() function, like this:

=IF(ERROR.TYPE(A3)<=8,CHOOSE(ERROR.TYPE(A3),"Ranges not intersecting","0 Divisor","Wrong data type","Invalid cell reference", "Unrecognized range or function name","Number error","Inappropriate function argument","Waiting for query data")& " on cell " & CELL("address",A3),"")

This will return a message like this instead:

ERROR_TYPE3

Hope this is useful to get your worksheets more user friendly.

Cascading Validation Lists

Here’s the scenario: on our worksheet, we want to choose a Country and the corresponding City. We want to limit the countries available to the user as well as the cities that they can choose. For start, we want to choose the country and on the second cell we can only put cities that correspond to that country. It makes sense, right?
So, let’s start we our simple example on how we can make cascading (or dependent) Validation Lists. In cell A2 we want to put the country and on cell B2 we want to put the city, like this example:
Cascading-Validation-Lists1

To start, we have to build our “database”. On a second sheet, I’ve made a list of countries that I want to have available for the user to choose on my validation list and I putted and index number that will correspond to the right cities list. So, for instance, for France, I used the index 2 that will be corresponding to the cities list 2. You will see after how this index number will be used.

Cascading-Validation-Lists2

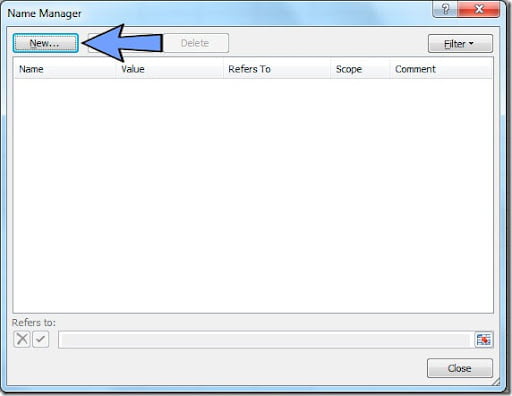
Now, if you’re using Excel 2010, you can have the “source” lists on a separated sheet but if you’re using Excel 2003 for instance, you can only have the values on a second sheet if you use named ranges. We will use the name ranges so that this cascading validation lists work on both versions. So, the next step is to create the named ranges for our lists. On your Formulas tab, we have the Name Manager button. When you click it, it will open the Name Manager dialog box.

Cascading-Validation-Lists3

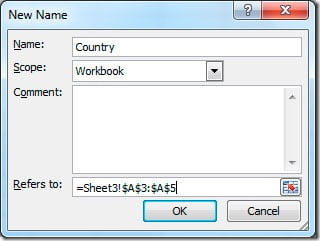
Click on the New button to add a new named range and it will open the New Name dialog box.
 
Cascading-Validation-Lists4

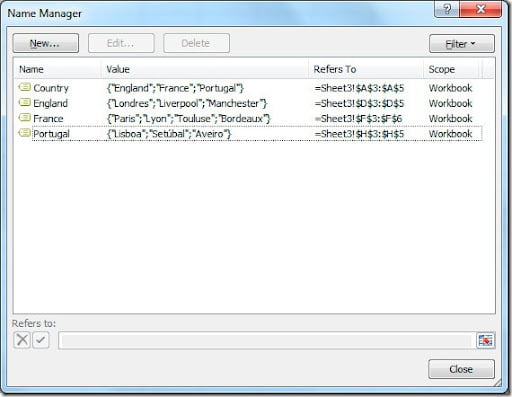
On the Name field you can put, for instance, “Country” for our first named range and on the “Refers to” field we will select, in this case, =Sheet3!$A$3:$A$5 to get the list of countries. Click OK to finish. Then we need to create the named ranges for the rest of the lists. Click again on the New button on the Name Manager dialog box and repeat the process to create three more named ranges: England, France and Portugal, selecting for the “Refers to” field the corresponding range of cities names. This will leaves with 4 named ranges, like this:

Cascading-Validation-Lists5

Now we can build our validations lists on our original sheet where we want to select the data from our “database”. With cell B1 selected (where we want to select our country), go to the Data tab and click on Data Validation and choose Data Validation.

Cascading-Validation-Lists6

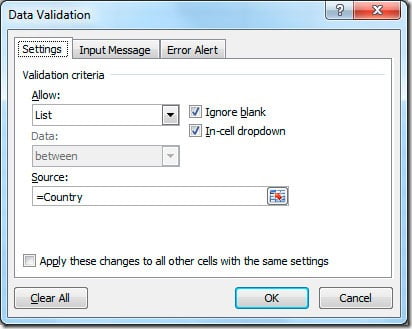
This will open the Data Validation dialog box.

Cascading-Validation-Lists7

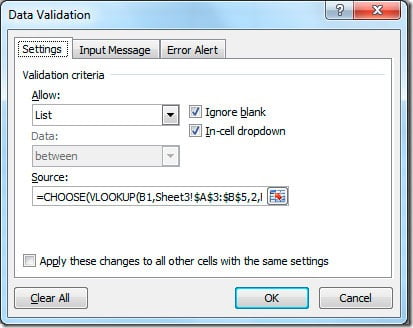
Now we want to use a list of options for the user to select so go ahead and on “Allow” change the value to “List”. This will open the Source field that is where we will put our Country named range. So put =Country and click OK. Now we want to make the second Validation List for the user to choose the city. Select, in this case, cell B2 that is where we will put this second validation list. Now comes the trick. We need to check the value of the country cell (cell B1) to get the index of the corresponding value on our “database”. If the user selected Portugal we need to get the index “3” that will tell us to get the list of cities that correspond to Portugal. For that we will make a VLOOKUP of the value in cell B1 in the Countries table. After we get the index value, we will “choose” the list to use for the Source of our second validation list. To make this we will use this formula:

=CHOOSE(VLOOKUP(B1,Sheet3!$A$3:$B$5,2,FALSE),England,France,Portugal)

So, what does this formula do? It will start for looking up the value on cell B1 against the values on our countries table and getting the corresponding index that it will use on the CHOOSE() function to get either the 1st, 2nd or 3rd named range.

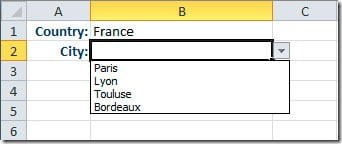
This is how our second validation list will look:

Cascading-Validation-Lists8

The result will be two cascading or dependent Validation Lists. If we choose country France, we will have on the cities Validation List the cities from France only.

Cascading-Validation-Lists9

This article demonstrates how you can make basic cascading Validation Lists to use on your sheets. You can take this example and use it on your own real life situations.