Showing posts with label Comments. Show all posts

Change font on all cell comments

This is a simple code that is very useful if you want to change the font size on all comments that you have on your Excel sheet.

Sub ChangeCommentsFont()
    Dim cmt As Comment
    For Each cmt In ActiveSheet.Comments
        With cmt.Shape.TextFrame.Characters.Font
            .Size = 11
        End With
    Next cmt
End Sub

You can change this code for setting a new font name, font color, etc.

An alternative to Cell Comments

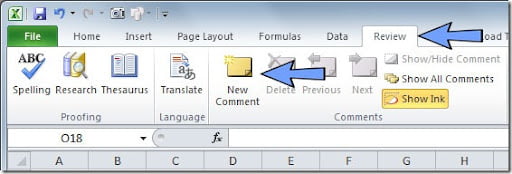
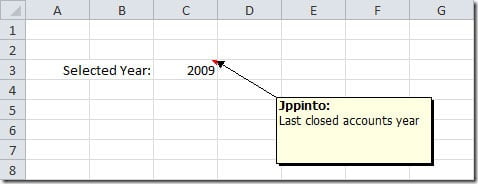
You can put a comment in any Excel cell by right clicking on the cell and selecting the Insert Comment option or by going to the Review menu tab and on the Comments group, select the New Comment.
 
Alternative_Comments0 
Here you can also choose Show All Comments to show or hide the comments on your sheet. On the File-Options-Advanced under the Display group, you have also some options to change the way your comments appear (or not) on your sheet. As we saw on the Change the Shape of a Cell Comment article, comments can have many different looks.
Excel provides an alternative to cell comments. You can use Excel’s Data Validation feature to display a pop-up message when a cell is selected. This way your message will always show up to the user even if the cell comments are disabled.
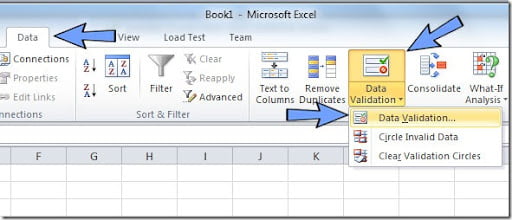
Do put a message on a cell using Data Validation, just select the cell where you want to put it and go to the Data menu tab, then Data Validation and select Data Validation option.
 
Alternative_Comments1 
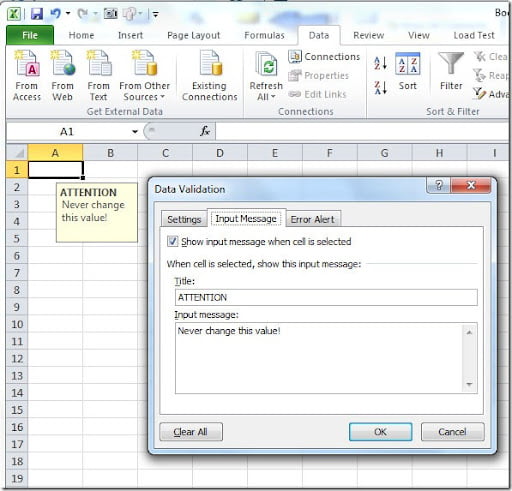
This will open the Data Validation dialog box. Under the Input Message tab you can fill the Title for your pop-up message (optional) and fill the Input Message field. This is the message that will appear when you select the cell. Don’t forget to leave the “Show input message when cell is selected” check box selected.
 Alternative_Comments2 
As you can see on the image above, the result will be a pop-up message when the cell (in this case cell A1) is selected. The pop-up message can be dragged to a different location.

Change the Shape of a Cell Comment

Cell comments is used very often on worksheets but they look always the same way because most users don’t know that they can change the shape of the comment. Instead of being this normal yellow rectangle, it can have lots shapes and colors.

change_comment_shape1

To change the comment shape, make sure that the comment is visible by right-clicking the cell where the comment is placed and choosing Show/Hide Comments options. Then just select the comment border and, in Excel 2003, go to the Draw menu and choose the Change AutoShape option and select the shape you for your comment.

change-cell-comment-shape2003
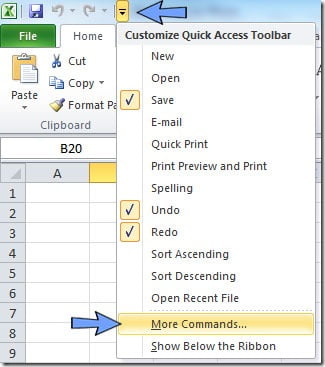
For Excel 2010, you have to add the Change Shape button to your Quick Access Toolbar (QAT). Click on the right arrow on your QAT to open the Customize Quick Access Toolbar, like shown on the picture below. Click on the More Commands option to open the Excel Options dialog window.

CAMERA3

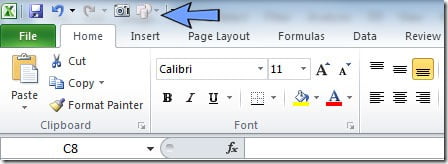
On the “Choose commands from” dropdown, select the Drawing Tools Format Tab. On the bottom list, select the Change Shape button and click the Add button. Click OK to close the Excel Options dialog box. Your Change Shape button will appear on your QAT like this:

change_comment_shape3
Now that you have your button, you can select your comment border, click on the Change Shape button and select the shape that you want for your comment. the result can be something like this:

change_comment_shape4
Don’t forget that you can also change the fill color of your comments, the color and weight of your comments border, as well as many other customizations that you can do to your comments for them to stand out on your worksheet.

VBA - Add photos to cells inside comments

I have a sheet with employees numbers and names and I wanted to see the corresponding photo of each employee. I have a folder with the photos of each employee. Each filename is the employee's number. To be able to see the photos, I decided to put each photo inside a comment on each employee number cell. This way, when I pass over the employee number, a comment window will show up with the employee's photo. It will look like this:
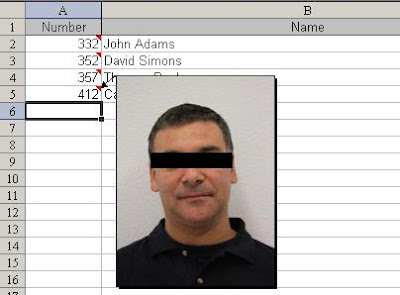
For this, I have the following code:

Sub InsertPictures()
    Dim cll As Range
    Dim rng As Range
    Dim strPath As String
    strPath = "D:\Photo Folder"
    With Sheets("Sheet1")
        Set rng = Range("A2:A416")
    End With
    For Each cll In rng
        If Dir$(strPath & "\" & cll.Value & ".jpg") <> "" Then
            With cll
                .ClearComments
                .AddComment ("")
                .Comment.Shape.Fill.UserPicture (strPath & "\" & cll.Value & ".jpg")
                .Comment.Shape.Height = 160
                .Comment.Shape.Width = 120
                .Comment.Shape.LockAspectRatio = msoTrue
                End With
        End If
    Next cll
End Sub
You can adjust the size of your photos by changing the Height (160) and Width (120).